FFmpeg with LCEVC

Introduction

V-Nova LCEVC is a set of optimised encoding and decoding libraries for MPEG-5 Part 2 Low Complexity Enhancement Video Coding (LCEVC). LCEVC simultaneously improves the coding efficiency and computational efficiency of conventional video codecs, both present (such as AVC/h.264, VP8, VP9, HEVC) and upcoming (such as AV1, EVC and VVC). LCEVC achieves this through a hierarchical (“multiscale”) image representation, coding tools specialized for residual data sub-layers, and massively parallel processing, as opposed to traditional, block-based Direct Cosine Transform (DCT)-based codecs.

The base layer in the hierarchy is produced by an existing base encoder for codecs such as h.264, HEVC, VP9 or AV1, which can be encoded and decoded using existing video hardware blocks available in consumer devices (or in software at much lower power consumption when such hardware blocks are not available). The enhancement sub-layers are extremely efficient and can be decoded in software with extremely low power/battery consumption. The combination of using the leveraged codec at a lower resolution, in conjunction with an extremely light enhancement able to compress high-frequency details accurately and fast, produces better compression efficiency overall, resulting in better quality at lower bitrates.

Figure 1.1 illustrates how the enhancement sublayers of LCEVC work on the decoder side:

FFmpeg is a popular tool amongst video developers. To facilitate the evaluation and utilisation of LCEVC as a codec, V-Nova LCEVC libraries are supported by a build of FFmpeg. This document describes how to use LCEVC in this specific build.

FFmpeg is available for both Windows and Linux. The examples throughout this document are for Windows. For Linux examples or general support, please reach out to V-Nova through the Download Portal or via support@v-nova.com.

FFmpeg encoder

For encoding, FFmpeg can combine the V-Nova LCEVC encoder with other codec implementations supported by the V-Nova plug-in system, as illustrated in Figure 1.2. This single set of libraries is currently available with support for h.264 and HEVC codecs. Supported base encoders include x264 and x265 as well as many others (e.g. NVEnc, QSV, Xilinx NGCodec, and more). Please contact V-Nova through the Download Portal or via support@v-nova.com to request a full list of supported base encoder implementations.
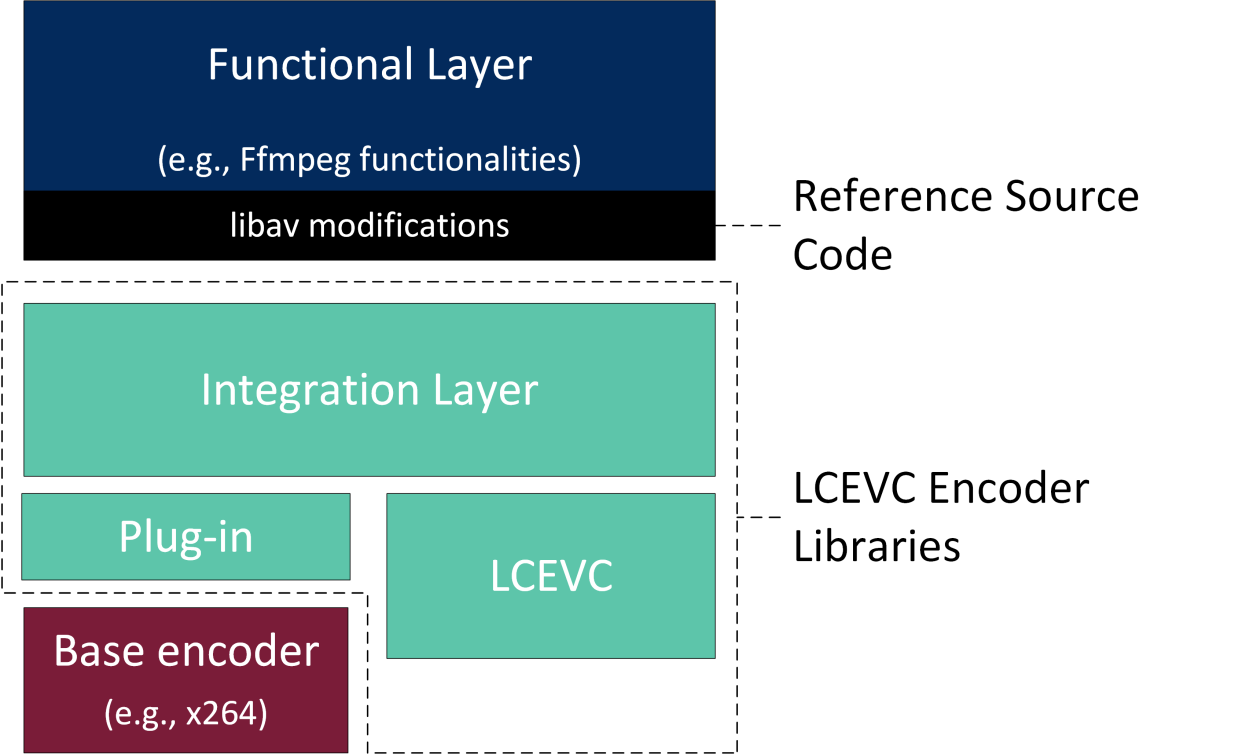
The encoded LCEVC enhancement is added to the Supplemental Enhancement Information (SEI) of the h.264 or HEVC Network Abstraction Layer (NAL) and is transmitted as standards-compliant metadata. In this way, the video stream can be decoded by any h.264 or HEVC compatible device at the base resolution, ensuring backwards compatibility.

To accommodate both the LCEVC and the base codec components (e.g. x264), this build of FFmpeg includes support for additional command-line parameters to configure LCEVC and the base encoder.

This version currently supports 8-bit, 4:2:0 encoding. 10-bit, 4:2:2 encoding is made available as untested functionality.

This build of FFmpeg supports most of the features and file types available within the FFmpeg project. The following input and output types are supported:

FFmpeg decoder

On the decoding side, V-Nova LCEVC decoding libraries are made available within tools, such as FFmpeg and FFplay. With the LCEVC-enabled FFmpeg decoder, most of the functionalities of FFmpeg and FFplay can be leveraged, such as: playback, decoding to YUV; and running metrics (PSNR, VMAF), without having to first decode to YUV, etc.

Important: A typical, non-LCEVC-enabled decoder always decodes LCEVC-enhanced streams without producing errors, but would decode only the lower-resolution base, ignoring the LCEVC enhancement. For full-resolution decoding, please ensure that an LCEVC-enabled decoder is used, e.g. according to example commands below:

Basic Playback

ffplay -vcodec lcevc_<codec> -i stream.ts

Where the value of -vcodec depends on the source, e.g lcevc_h264, lcevc_hevc or lcevc_av1.

Decoding to YUV

ffmpeg -vcodec lcevc_<codec> -i stream.ts -vcodec rawvideo decoded_video.yuv

Putting the software together

The LCEVC-enabled FFmpeg build can be easily assembled. You will have received software in the following packages:

  • FFmpeg: the FFmpeg binaries with support for x264 and x265

  • lcevc: the LCEVC libraries both encoder and decoder libraries

  • base codecs: any additional base codecs requested (if applicable)

To set it all up, simply:

  1. UnZip the FFmpeg binaries for your operating system into a local directory of your choice (or create a new one). This will be your “FFmpeg directory”.

  2. Copy the LCEVC encoder and decoder libraries with their subfolders onto the root FFmpeg directory

  3. Copy any additional base codecs and base codec plug-ins that you may have received from their folder onto the root FFmpeg directory (if applicable).

In some cases, for example when installing the LCEVC-enabled FFmpeg build on a clean docker container, you may need to install some or all of the dependencies listed below. Alternatively, installing the generic FFmpeg build may include some of these dependencies.

nasm pkg-config libxml2-dev

Other potential dependencies for an LCEVC-enabled FFmpeg build may include:

dbus libapparmor1 libasound2 libasound2-data libasyncns0 libbsd0 libc6 libdbus-1-3 libexpat1 libflac8 libfontconfig1 libfontenc1 libfreetype6 libgl1 libglvnd0 libglx0 libice6 libogg0 libpng16-16 libpulse0 libsdl2-2.0-0 libsm6 libsndfile1 libuuid1 libvorbis0a libvorbisenc2 libwayland-client0 libwayland-cursor0 libwayland-egl1 libwrap0 libx11-6 libx11-xcb1 libxau6 libxaw7 libxcb-dri3-0 libxcb-icccm4 libxcb-image0 libxcb-keysyms1 libxcb-randr0 libxcb-render-util0 libxcb-render0 libxcb-shape0 libxcb-shm0 libxcb-sync1 libxcb-util1 libxcb-xfixes0 libxcb-xinerama0 libxcb-xkb1 libxcb1 libxcomposite1 libxcursor1 libxdamage1 libxdmcp6 libxext6 libxfixes3 libxft2 libxi6 libxinerama1 libxkbcommon0 libxkbfile1 libxmu6 libxmuu1 libxpm4 libxrandr2 libxrender1 libxres1 libxss1 libxt6 libxtst6 libxv1 libxvmc1 libxxf86vm1 xkb-data zlib1g

Quick Tip: For Ubuntu, running sudo apt-get install -y followed by the above dependencies list will install all of them at once.

On Linux systems, especially where more than one build of FFmpeg is available, you may have to set the library path to the local folder for the command to work:

sudo LD_LIBRARY_PATH=.

For further support or to report issues, please reach out to V-Nova through the Download Portal or via support@v-nova.com.

Please note, LCEVC is proprietary to V-Nova and subject to V-Nova's proprietary licence. Therefore, distribution of any pre-compiled subsystem is strictly prohibited, even between group companies.

Additional base codecs

LCEVC can enhance any codec implementation through a simple plug-in system. V-Nova has developed multiple plug-ins for the most popular base codec implementations. These can be requested and will be packaged as part of a release in a separate base codecs folder. The folder will include:

  • the base codec plug-ins

  • (optionally) the base codec libraries

The content of the above folders needs to be copied into the root FFmpeg directory

Getting started

Overview

Most standard FFmpeg command-line options are included, as well as additional options for configuring V-Nova LCEVC.

This FFmpeg release supports LCEVC with an x264 and x265 base. Additional base codecs are available (e.g. NVEnc, libvpx, QSV, Xilinx NGcodec, etc.) and a patch for your build of FFmpeg can be provided by V-Nova upon request.

LCEVC codec

An additional FFmpeg video codec, LCEVC, is available in this build. It is invoked by specifying the codec to enhance and the implementation of the base codec to be enhanced. Its syntax is as follows:

-c:v lcevc_<codec> -base_encoder <codec implementation> -eil_params "<enhancement parameters string>;<base parameters string>"

Where <codec> can be h264 or hevc, and <codec implementation> can be a specific software implementation such as x264 or nvenc_hevc.

The behaviour of lcevc_<codec> is described by the following help command in FFmpeg:

ffmpeg -help encoder=lcevc_h264

ffmpeg -help encoder=lcevc_hevc

eil_params is a command line string that is used to pass parameters to both enhancement and base codec. Its behaviour is described later.

Bitrate, GOP length and framerate

There are a number of parameters that are considered generic, i.e. not specific in use to either LCEVC or the base codec it enhances. These parameters are bitrate, GOP length and framerate. Furthermore, these parameters are used to calculate initialisation values for LCEVC and base codec.

Bitrate, GOP length and framerate are NOT set through the eil_params string. Instead, they use the FFmpeg generic command line options:

  • -b:v for video bitrate

  • -g for GOP length

  • -r for framerate

Since these settings are used by the LCEVC integration layer to initialise the common rate control engine, the equivalent options in the base codec are deprecated. For example, bitrate=1000k or keyint=120 may produce unexpected behaviour or return an error. Please, use -b:v and -g instead.

EIL (Encoding Integration Layer) parameters and syntax

EIL parameters and syntax overview

The Encoding Integration Layer (EIL) is a V-Nova library that combines the base encoder and the LCEVC enhancement, orchestrating the combined behaviour. Moreover, the EIL is architected to support any base codec implementation through a plug-in system that makes it generic and independent. The EIL will parse the command line parameters at initialisation and configure both base and enhancement as required.

It is through the eil_params parameter, that both the LCEVC enhancement and the base codec are configured, for everything other than bitrate, frame rate and GOP length. Its syntax is as follows, where eil_params is a semicolon-separated string of parameters and values that are passed to the LCEVC enhancement layer:

ffmpeg.exe -i input.mp4 -c:v lcevc_h264 -base_encoder x264 -eil_params "<parameter1>=<value1>;<parameter2>=<value2>;…" output.ts

<parameter1>, <parameter2>, etc., are passed to the EIL interface, and configure both the V-Nova LCEVC encoder and the base encoder.

Constant Bitrate (CBR) versus Constant Rate Factor (CRF)

Overview

LCEVC encodes enhanced streams in Constant Bitrate mode (CBR) or (either uncapped or capped) Constant Rate Factor (pCRF) mode.

Rate control window type and length

The LCEVC rate control can work according to different modes: “chunk” (default) or “rolling window”. When in streaming “chunk” mode, the rate controller resets the leaky bucket fill up level at the beginning of each streaming chunk, to avoid unnecessary influence from one chunk to the next (e.g. making a chunk slightly smaller than the target bitrate just because the previous one was slightly bigger, or vice versa). When in “rolling window” mode, instead, the leaky bucket fill up level is never reset.

“Chunk” mode is recommended for ABR chunk-based streaming, while “rolling window” mode is recommended for low-latency video as well as for tests involving short self-similar sequences.

“Chunk” mode is active by default, so there is no need to specify the corresponding setting within eil_params (rc_pcrf_window_type=chunk).

To activate the “rolling window” mode, the following command should be used within eil_params:

rc_pcrf_window_type=rolling

By default, the rate control window length is two GOPs, but you can specify a different length in frames with the following command within eil_params:

rc_pcrf_window_duration_frame=<number of frames in a window>

CBR

CBR ensures that the same bitrate is maintained throughout the clip, as is required for many streaming video systems. This is achieved in FFmpeg by specifying the target bitrate with –b:v parameter, as in the following example (CBR at 2 Mbps).

Note: By default, in FFmpeg, -b:v bitrate is interpreted as bps and a suffix for kbps and Mbps must be used, e.g. -b:v 2000k specifies that bitrate = 2 Mbps.

ffmpeg.exe -i input.mp4 -c:v lcevc_h264 -base_encoder x264 -b:v 2000k output.ts

In LCEVC, a CBR stream can have a base following a different rate control paradigm. In LCEVC, the base encoder rate control can work with either a CBR base layer (default), or a CRF base layer.

  • rc_pcrf_base_rc_mode=cbr (default) is recommended for most codecs. By default, LCEVC will also adapt the base bitrate target dynamically, based on the characteristics of the sequence.

  • rc_pcrf_base_rc_mode=crf may also be used, with base codecs that do support CRF (e.g. x264, x265).

To activate the “CBR base” with a fixed bitrate target for the base (not recommended for best visual quality), the following command should be used: rc_pcrf_base_reconfig_mode=0.

The FFmpeg command for a 2 Mbps CBR, with default CBR base, is as follows:

ffmpeg.exe -i input.mp4 -c:v lcevc_h264 -base_encoder x264 -b:v 2000k -eil_params output.ts

The FFmpeg command for a 2 Mbps CBR, with CRF base, is modified as follows:

ffmpeg.exe -i input.mp4 -c:v lcevc_h264 -base_encoder x264 -b:v 2000k -eil_params "rc_pcrf_base_rc_mode=crf" output.ts

pCRF, capped and uncapped

pCRF, which is the V-Nova LCEVC equivalent of x264’s CRF, aims to ensure that a certain quality factor is maintained throughout the clip. Lower pCRF values mean less compression and higher quality, at the expense of larger file sizes. The pCRF value is a floating-point fractional number with a meaning similar to x264’s CRF (e.g. typical value range 20-36), controlling the overall quality of base + enhancement. To activate pCRF, the following command is used, where X is the chosen pCRF value: rc_pcrf=X

pCRF uncapped: For uncapped pCRF, the bitrate parameter must be set to 0 or left unspecified, as per the following command line example, in which pCRF 30 is specified.

ffmpeg.exe -i input.mp4 -c:v lcevc_h264 -base_encoder x264 [-b:v 0] -eil_params "rc_pcrf=30" output.ts

pCRF capped: For capped pCRF, the bitrate parameter must be set to the desired maximum bitrate (or cap), as per the following command line example, in which pCRF 30 is specified with a maximum of 3,000kbps (3Mbps). Specifying the LCEVC minimum bitrate to 0 will allow the base to use the entire cap if required. The base mode must also be set manually to CRF in this scenario.

ffmpeg.exe -i input.mp4 -c:v lcevc_h264 -base_encoder x264 [-b:v 3000] -eil_params "rc_pcrf=30;rc_pcrf_min_bitrate=0;rc_pcrf_base_rc_mode=crf" output.ts

QP Min

The QP (Quantization Parameter) controls the amount of compression for every macroblock in a frame. Large values mean that there will be higher quantization, more compression, and lower quality. Lower values mean the opposite. The full range available for QP is 0-51.

By setting the min QP value this will stop the rate control using a value below X. This needs to be done within the eil_params.

ffmpeg.exe -i input.mp4 -c:v lcevc_h264 -base_encoder x264 -eil_params "rc_pcrf_base_min_qp=14;" output.ts

QP Max

Setting the max QP value will stop the rate control using a value above X. This needs to be done within the eil_params.

ffmpeg.exe -i input.mp4 -c:v lcevc_h264 -base_encoder x264 -eil_params "qp-max=32" output.ts

Important note: Not all base plugins support this field.

Single-pass versus multi-pass

V-Nova LCEVC is a single-pass encoder, and provides the same results as if it were included in a multi-pass implementation; therefore, the FFmpeg -pass parameter is not required, as the codec always operates in single pass.

LCEVC tuning

lcevc_tune

In line with x264 “tunes,” there are six variants of lcevc_tune, according to the aim of the encodes. Depending on the chosen tuning, the encoder will combine optimal settings and parameters according to that goal. The settings are as follows:

As explained in 1.3, please make sure to decode LCEVC streams with the LCEVC-enabled decoder, otherwise the LCEVC data will be ignored and you will decode in backward-compatibility mode. Also, if you are computing objective metrics, please remember to disable dithering at the decoder, as explained in 4.2.5

Examples of command lines:

CBR, lcevc_tune vq:

ffmpeg.exe -i input.mp4 -c:v lcevc_h264 -base_encoder x264 -r 30 -g 60 -b:v 1000k -eil_params “preset=medium” lcevc_x264_500k_vq.mp4

CBR, lcevc_tune vmaf:

ffmpeg.exe -i input.mp4 -c:v lcevc_h264 -base_encoder x264 -r 30 -g 60 ‑b:v 1000k -eil_params "lcevc_tune=vmaf;preset=medium" lcevc_x264_500k_vmaf.mp4

CBR, lcevc_tune psnr:

ffmpeg.exe -y -i input.mp4 -c:v lcevc_h264 -base_encoder x264 -r 30 -g 60 ‑b:v 1000k -eil_params "lcevc_tune=psnr;preset=medium" lcevc_x264_500k_psnr.mp4

Uncapped pCRF, lcevc_tune vmaf:

ffmpeg.exe -y -i input.mp4 -c:v lcevc_h264 -base_encoder x264 -r 30 -g 60 ‑eil_params "rc_pcrf=27;lcevc_tune=vmaf;preset=medium" lcevc_x264_pcrf27_vmaf.mp4

Note: the x264 -preset medium is called out specifically in this command line. However, please be aware that if not specified, this build of FFmpeg will default to medium.

LCEVC preset

lcevc_preset

Since SDK V 3.5 “lcevc_preset” is supported. Similar to the -preset or -cpu-used configuration of other codecs (i.e. x264, x265, VPx, AV1), lcevc_preset provides six discrete combinations of encoding parameters to optimise speed and video quality trade-off depending on the use case. The options are from 0 to 5, where 0 is the slowest (i.e., consistently with VPx/AV1) while achieving the maximum quality, and 5 is the fastest with 1 as default.

The “lcevc_preset” should be manually set by the user with similar criteria used for the choice of the base encoder preset. Here is our recommendation of lcevc_preset according to the preset of the x264/x265 base encoder. The ‘relative speed index’ provides a ballpark indication of the relative encode time of the various presets vs. the default one; it’s based on LCEVC x264 (medium), an index of ‘110’ means that the given preset takes 10% more encode time vs. the default, while ‘60’ means 40% less encode time. Note: the ratio is approximated and based on a small set of 1080p-encoded sample clips, so results may vary according to testing conditions.

V-Nova LCEVC-specific parameters

As with all encoders, additional parameters are available to tune performance optimally for a use case. To help ensure high quality output, when using lcevc_h264, the encoder selects, by default, the appropriate parameters for various combinations of bitrate and resolution. Automatic parameter selection can be overridden by the command line.

The following parameters must be used as specified in section 3.2, as arguments to the -eil_params FFmpeg parameter.

V-Nova LCEVC scaling mode

scaling_mode_level0

Specifies the scaling mode for the base encoder picture in the LCEVC hierarchy. In combination with the associated rate control strategies, 2D, 1D and 0D influence the relative allocation of bitrate to the low-, medium- and high-frequency portions of the content. Additional controls, not described in this manual, are available to advanced users.

2D is generally recommended for HD and UHD content and is the default scaling mode setting. 1D instead is the recommended mode, and default setting, for lower resolutions (540p and below).

ffmpeg.exe -i input.mp4 -c:v lcevc_h264 -base_encoder x264 -eil_params "scaling_mode_level0=2D" output.ts

In certain cases (e.g. at high bits per pixel for HD/UHD, or at medium bits per pixel for lower resolutions), 1D may provide a preferable trade-off between robustness to banding/blocking vs. loss of resolution impairments, especially when the content is viewed on a large display or from viewing distances lower than 2H.

Especially when comparison of different encoding parameters is possible (e.g. Convex Hull approach for VOD dynamic optimization, CAE, etc.), we recommend to also include 1D as option for high-bitrate and low-resolution profiles. At relatively low bits per pixel, 2D will provide better protection from big impairments during complex scenes, whilst possibly generating some loss of resolution in low-contrast areas during low-to-medium complexity scenes. Vice versa for 1D scaling mode.

Encoding Mode

encoding_mode

Specifies if LCEVC enhancement or native coding is applied.

Example:

ffmpeg.exe -i input.mp4 -c:v lcevc_h264 -base_encoder x264 -eil_params "scaling_mode_level0=0D;encoding_mode=native" output.ts

Note: when using encoding_mode=native, the LCEVC enhancement is effectively switched off. In this mode, it is recommended NOT to specify any LCEVC specific parameters in the eil_params string to avoid unexpected behaviour or erroring.

Dithering

Specifies custom dither. Dither is an intentionally applied form of subtle noise / camera grain used in constrained bandwidth conditions, to minimise visual impairments, such as colour banding or blocking artefacts due to a constrained base layer.

For some scenes and types of content, dithering can provide a significant uplift in perceived quality, although objective metrics will always be worse when dithering is active. For this reason, dithering is turned off by default for all lcevc_tune settings except lcevc_tune vq.

Below is an example (with gamma increased to 3.0 in order to highlight the effect) of how dithering reduces aliasing on edges and reduces banding/blocking impairments. The effect is even more pleasant in motion, since banding and blocking may follow motion patterns distinct from the object that they overlay.

Figure 4.1 — Same LCEVC encode (dark scene, gamma adjusted to 3.0), decoded with adaptive dithering off (i.e., ignoring the dithering signalling) vs. adaptive dithering on.

dc_dithering_type

Specifies whether to apply a uniform dithering algorithm.

dc_dithering_strength

Specifies the maximum dithering strength. Dithering preferences are often subjective:

  • The default value is 4.

  • A value of 7-8 displays a more visible dither.

  • A value of 2-3 should be used for substantially imperceptible dither.

Dithering is applied dynamically and content-adaptively by the encoder, depending on the quality of the base layer (base qp), on the level of lighting of a scene as well as on other factors. Irrespective of the specified strength, it automatically disappears in static/low-motion, low-detail scenes, and its intensity is automatically modulated on a frame-by-frame basis, according to the base QP, starting above a certain threshold (dc_dithering_qp_start), and maxing out above a second threshold (dc_dithering_qp_saturate). When dithering is activated, also at low base QP some dithering may still be applied by the encoder in case of dark scenes with relatively noisy source content.

dc_dithering_qp_start

This parameter specifies the base QP value at which to start applying dither. Range: 0-51. Default: 24.

dc_dithering_qp_saturate

This parameter specifies the base QP value at which to saturate dither. Range: 0-51. Default: 36.

Regardless of the base QP value, other low-level parameters make dithering adapt dithering strength settings based on frame luminosity (according to contrast sensitivity function) as well as presence of no-contrast plain graphics which would not benefit from dithering.

Dithering at the decoder

V-Nova recommends that dithering be used for optimal subjective visual quality. However, when calculating objective metrics for content that was encoded with dithering enabled, dithering must be disabled via the following command:

disable_dithering

Enables/disables the dithering algorithm (see section 8 for use with an FFmpeg decoding command line).

As an example:

ffmpeg.exe -vcodec lcevc_h264 -disable_dithering 1 -i stream.mp4 -vcodec rawvideo output.yuv

M Adaptive Downsampling

The M Adaptive Downsampling settings influence a combination of LCEVC advanced encoder settings that affect the interlocked image processing effects of downsampler filter, upsampler filter, predicted residuals and full-resolution residual data. The LCEVC format is extremely flexible, allowing the encoder to leverage both non-linear (as well as content-adaptive) downsampling methods and signal custom (content- or context- adaptive) upsampling kernels. The upsampled reconstruction, before adding full-resolution details, is further amended by the LCEVC decoder with a non-linear processing step called “Predicted Residuals”. The combination of these cascade of non-linear adaptive filters generates a sort of simplified super-resolution upsampling, which is further corrected by adding details (residual data) that could not be otherwise reconstructed, so as to approximate the source as closely as possible, up to mathematically lossless.

The overall compression efficiency of LCEVC-enhanced multi-layer coding vs. the enhanced single-layer codec used alone at full resolution comes from sensibly separating high-frequency energy (“details”) from medium-to-low frequency energy (“core signal”), and efficiently compressing both components of the signal with:

a) low-complexity tools specifically designed to efficiently compress sparse high-frequency details via light-weight parallel processing

and

b) a traditional single-layer codec operating more efficiently on the core signal by compressing it at a lower resolution.

Modifying some key elements of this non-linear combination of resampling and signal decomposition tools generates profound impact to both visual quality and metrics. In the current implementation we established some combinations that work reasonably well, and we embedded them in the various lcevc_tunes. But the calibration effort isn’t infallible: we observed material divergence in how different objective metrics (as well as subjective preferences) react to changes in these low-level settings. In short, there is still much room for improvement and fine-tuning. Future releases will further improve the way in which the encoder automatically calibrates these tools based on user preference and on the specificity of the content being encoded.

The M adaptive downsampling (m_ad_mode) settings deviate from basic linear kernels and provide some degree of control for one of the elements of this “chain reaction” of interlocked non-linear image processing tools.

m_ad_mode

Specifies the M adaptive downsampling mode (String).

Notice: MSE-based metrics such as PSNR and SSIM strongly “dislike” the use of M adaptive downsampling, so if you are in any way looking at any MSE-based metrics, either set m_ad_mode=disabled or use the corresponding lcevc_tune (which, among other things, will set m_ad_mode to "disabled). On the other side, both formal subjective MOS scores and VMAF tend to agree that some degree of M adaptive downsampling improves visual quality.

m_hf_strength

m_hf_strength, which accepts fractional values between 0 and 0.5, allows to increase or decrease the energy of high frequencies, with 0 being a preference for softer details. Default values, which are modified adaptively by the encoder if you do not specify anything, are comprised between 0 and 0.35.

m_lf_strength

m_lf_strength, which accepts fractional values between 0 and 1.0, allows you to modify the way in which full resolution details are separated from the mid-to-low frequencies that are passed as low resolution to the base codec. Default values, which are modified adaptively by the encoder if you do not specify anything, are comprised between 0 and 0.5.

IPP mode (no b-frames)

For certain low-latency applications, such as video conferencing, the V-Nova LCEVC rate control includes a specific IPP mode, i.e., in which b-frames are not used. This mode must be turned on for optimal performance, in combination with setting b-frames to zero (bframes=0 in the case of x264); otherwise the V-Nova LCEVC rate control will make incorrect assumption about the GOP structure, and consequently, will make suboptimal rate allocations.

rc_pcrf_ipp_mode

Specifies whether to apply IPP mode.

Example:

ffmpeg.exe -i input.mp4 -c:v lcevc_h264 -base_encoder x264 -eil_params "bframes=0;rc_pcrf_ipp_mode=1" output.ts

Optimising Encoding CPU utilization

There are two main tools we can use for CPU optimisation: 1; NUMA awareness, 2; api mode. NUMA For best performance it is crucial to make sure that a process does not cross NUMA nodes or physical CPU sockets as the LCEVC SDK is currently not NUMA aware. This is most relevant when using physical server hardware or large compute cloud environments. Linux: run 'lscpu' Windows: Open Task Manager > Performance > right click > change graphs to NUMA node, if grey your system only has 1 node.

NUMA node0 CPU(s):   0-17,36-53
NUMA node1 CPU(s):   18-35,54-71          

Here is an example of the NUMA information from a large Linux server. If we are to run encodes in parallel, job A would be best on NUMA 0, job B on NUMA 1 and so on. This is to stop frame data having to transfer between nodes which is a bottleneck for encoding. This can be achieved by using a tool such as 'taskset' on Linux or 'AFFINITY' on Windows to restrict the cores that the function is allowed to run on. API Mode Another method is to add the following to the eil parameters within your LCEVC encode. This is system dependent and should be used on larger systems, but can also have a negative impact on encoding performance on smaller machines (below 16 threads) where it should not be used.

eil_params= "api_mode=asynchronous" 

This parameter decouples the encoding pipeline into different queues rather than processing all in one queue across the threads.

Lower resolutions (720p and below)

General concepts

Even though intermediate resolutions such as 936p are feasible, typical V-Nova LCEVC resolutions below 1080p most frequently range from 720p down to 360p. Resolutions lower than 360p are not recommended, even for extremely low bitrates, e.g. <50 kbps. For these bitrates, it is preferable to employ a lower frame rate; for example, 360p at 7-15 fps is recommended. As illustrated above, for resolutions lower than 540p and relatively high quality points (e.g. proximity to “convex hull”), 1D mode is generally recommended.

In general, for a given bitrate, V-Nova LCEVC [x264] allows retaining a higher resolution vs. that of the corresponding native codec [x264]. For example, for mobile use cases and bitrates lower than 800 kbps, the following bitrate ranges are suggested, based on V-Nova LCEVC x264 -preset slow.

V-Nova LCEVC settings for lower resolutions are typically in line with the recommendations of the previous sections. The quality of V-Nova LCEVC-enhanced encoding at low bitrates depends mostly on determining the best combination of bitrate, resolution and frame rate for the specific content.

Objective vs. Subjective Metrics

A Convex Hull approach with VMAF can be helpful to determine high-level guidelines and relative configurations among different content or base codecs; however, visual inspection is a must. This is a general rule for V-Nova LCEVC, as demonstrated by several comparisons of rate-quality curves obtained with objective metrics, vs. the rate-quality curves obtained with “ground-truth” formal ITU-R BT.500 DSIS Mean Opinion Score (MOS) subjective tests. At lower qualities, where differences vs. the original source abound, this is even more true, since pixels (and impairments) “are not created equal”.

Objective metrics can be used to compare different V-Nova LCEVC settings, but may not fairly represent subjective quality when comparing different codecs, especially at relatively low qualities, where renditions are significantly impaired, and the “location” and nature of the impairments (e.g. blocking/banding/dragging vs. selective softening/loss of resolution) are of critical importance to subjective quality.

Putting it all together, the following scripts can be tested as starting points for CBR and CRF. Assuming that the scripts would be used to encode short test sequences, we included commands to set the rate control window type to “rolling window” mode.

1080p and higher resolution

The following examples refer to encoding a 1080p60 YUV source.

Important: If you intend to run objective metrics, then please remember to disable dithering on the decoder.

Example of recommended command line for 1080p CBR with CBR base, tune VQ, with bitrate set at 3 Mbps:

ffmpeg.exe -y -framerate 59.97 -f rawvideo -pix_fmt yuv420p -s 1920x1080 -i input-p60-1920x1080.yuv -c:v lcevc_h264 -base_encoder x264 -g 120 -b:v 3000k -eil_params "preset=medium;rc_pcrf_window_type=rolling" output-p60-1920x1080_3000kbps.ts

CBR (with CRF base)

Example of a recommended command line for CBR with CRF base, with bitrate set at 3 Mbps:

ffmpeg.exe -y -framerate 59.97 -f rawvideo -pix_fmt yuv420p -s 1920x1080 -i input-p60-1920x1080.yuv -c:v lcevc_h264 -base_encoder x264 -g 120 -b:v 3000k -eil_params "rc_pcrf_base_rc_mode=crf;preset=medium;rc_pcrf_window_type=rolling" output-CRFbase-p60-1920x1080_3000kbps.ts

pCRF (uncapped)

Example of the above command line for pCRF, with pCRF set at 27: (notice: -b:v 0 can also be avoided, since it is the default value of -b:v for Ffmpeg)

ffmpeg.exe -y -framerate 59.97 -f rawvideo -pix_fmt yuv420p -s 1920x1080 -i input-p60-1920x1080.yuv -c:v lcevc_h264 -base_encoder x264 -g 120 -b:v 0 -eil_params "rc_pcrf=27;" output-p60-1920x1080_pcrf27.ts

pCRF (Capped)

Example of the above command line for pCRF, with pCRF set at 27 and cap of 5mbps. ffmpeg.exe -y -framerate 59.97 -f rawvideo -pix_fmt yuv420p -s 1920x1080 -i input-p60-1920x1080.yuv -c:v lcevc_h264 -base_encoder x264 -g 120 -b:v 5M -eil_params "rc_pcrf=27;rc_pcrf_min_bitrate=0;rc_pcrf_base_rc_mode=crf" output-p60-1920x1080_pcrf27.ts

720p and lower resolutions

The following examples refer to encoding a 360p30 YUV source.

Example of recommended command line for 360p CBR, bitrate set at 170 Kbps:

ffmpeg.exe -y -framerate 25 -f rawvideo -pix_fmt yuv420p -s 640x360 -i input-p25-640x360.yuv -c:v lcevc_h264 -base_encoder x264 -g 50 -b:v 170k -eil_params "preset=medium;rc_pcrf_window_type=rolling" output-p25-640x360_170kbps.ts

CBR (with CBR base) – 540p30

Example of a recommended command line for CBR, bitrate set at 450 kbps:

ffmpeg.exe -y -framerate 29.97 -f rawvideo -pix_fmt yuv420p -s 960x540 -i input-p30-960x540.yuv -c:v lcevc_h264 -base_encoder x264 -g 60 -b:v 450k -eil_params "preset=medium;rc_pcrf_window_type=rolling" output-p30-960x540_450kbps.ts

More advanced settings can allow to set specific CBR rates for the base, overriding the default values.

pCRF (uncapped) – 720p

Example of command line for pCRF set at 30:

ffmpeg.exe -y -framerate 29.97 -f rawvideo -pix_fmt yuv420p -s 1280x720 -i input-p30-1280x720.yuv -c:v lcevc_h264 -base_encoder x264 -g 60 -b:v 0 -eil_params "rc_pcrf=30;preset=medium;rc_pcrf_window_type=rolling" output-p30-1280x720_pcrf30.ts

V-Nova LCEVC with other base encoders

The LCEVC enhancement layer behaves differently depending on the performance of the base codec and plugin it is working with. Please, consult V-Nova on how to best tune supported base encoder plugins.

x265

The LCEVC-enhanced x265 encoder can be setup as follows:

-c:v lcevc_hevc -base_encoder x265 -eil_params "<enhancement parameter string>;”

The following command line is an example using configurations for both the enhancement and the base codec.

ffmpeg.exe -y -i source.y4m -c:v lcevc_hevc -base_encoder x265 -g 60 -b:v 1000k -eil_params "preset=medium;lcevc_tune=vq;" output.ts

Note that GOP Length is no longer passed directly to x.265 using keyint as a parameter in the eil_params string. Rather, it is set using the global -g option in FFmpeg. Other options for GOP length, such as min-keyint remain available and applicable with the use of scene-cut.

AV1 (LibAOM)

The LibAOM encoder is configured using the formatting below:

-c:v lcevc_av1 -base_encoder aom -eil_params "<enhancement parameter string>;”

Here is a full example command, encoding AV1 with LCEVC in FFmpeg:

ffmpeg -y -i input.yuv -c:v lcevc_av1 -base_encoder aom -g 60 -b:v 1000k -eil_params "threads=8;cpu-used=4;row-mt=1;lcevc_tune=vq;" output.webm

To define the balance of encoding speed and quality libaom uses 'cpu-used' with a range 0-8 (0 Quality, 8 performance) . This should be used in partnership with lcevc_preset guidance.

Note that B-Frames are not applicable in AV1, the picture type structure is different and uses S-frame and Intra frames. There is no parameter control for frame types but the -g (GOP) setting is critical to define the interval of the 'Intra' frame type.

Note that the output container needs to be webm.

AV1 (SVT-AV1)

Intel's SVT-AV1 is configured using the formatting below:

-c:v lcevc_av1 -base_encoder svt_av1 -eil_params "<enhancement parameter string>;”

'Preset' is the control to define the balance of encoding speed over quality for the base codec. The values available are 0-13 (P1 quality, P12 performance). This should be used in partnership with lcevc_preset guidance. Note that B-Frames are not applicable in AV1, the picture type structure is different and uses S-frame and Intra frames. There is no parameter control for frame types but the -g (GOP) setting is critical to define the interval of the 'Intra' frame type.

Note that the output container needs to be webm

VP9

VP9 is configured in a similar way to x265 where most extra parameters are required within the eil param string otherwise they won't be passed corretly:

-c:v lcevc_vp9 -base_encoder vpx_vp9 -eil_params "<enhancement parameter string>;”

The following command line is an example using configurations for both the enhancement and the base codec.:

ffmpeg -y -i source.yuv -c:v lcevc_vp9 -base_encoder vpx_vp9 -s 1920x1080 -r 30 -b:v 3000k -g 120 -eil_params "quality=good;cpu-used=0;row-mt=1" output.webm

To define the balance of encoding speed and quality VP9 uses; 'cpu-used' (0-8) & 'quality' (Best, good, realtime). When the quality parameter is good or best, values for -cpu-used can be set between 0 and 5, when quality is set to realtime, the available values for -cpu-used are 0 to 8 (0 Quality, 8 performance). This should be used in partnership with lcevc_preset guidance.

As guided in the VP9 documentation -row-mt=1;is advised to enable multi threading operation.

Note B-Frames are not applicable in VP9, the picture type structure uses Intra or Key frames. There is no parameter control for frame types but the -g (GOP) setting is critical to define the interval of the 'Intra' frame type.

Note that the output container needs to be webm.

QSV

Quick Sync Video is Intel's hardware dedicated encoding and decoding tools, the codec has certain hardware requirements which can be found on Intel's website. QSV supports encoding of H264, HEVC, VP8 and VP9. Encoding with LCEVC is similar to previous examples:

-c:v lcevc_h264 -base_encoder qsv_h264 -eil_params "<enhancement parameter string>;”

-c:v lcevc_hevc -base_encoder qsv_hevc -eil_params "<enhancement parameter string>;”

The following command line is an example using configurations for both the enhancement and the base codec:

ffmpeg -y -vcodec rawvideo -pix_fmt yuv420p -s 1920x1080 -r 30 -i source.yuv -c:v lcevc_hevc -s 1920x1080 -r 30 -b:v 5000k -g 60 -base_encoder qsv_hevc output.ts

There is different level of support for MFX (aka Intel Media SDK) between Windows and Linux on Windows - supported on a broader range of chipsets on Linux - supported on gen8+ chipsets only, which use iHD driver for older chipsets on Linux a direct integration of VAAPI is required, basically an extra EIL plugin, how difficult - unknown. This will enable older Intel chipsets to be used on Linux for LCEVC encodes (with hardware base encoding, which base codecs are supported by which generations of chipsets - another question

NVENC Plugin

NVENC is NVidia's built-in video encoding available on a broad range of its GPU cards, details on the specific support from different NVidia hardware is available here. NVENC can support both AVC/H.264 and HEVC/H.265 encoding depending upon the GPU in question. Running LCEVC-enhanced encoding of these two base encoders can be initiated with the following commands:

-c:v lcevc_h264 -base_encoder nvenc_h264 -eil_params "<enhancement parameter string>;”

-c:v lcevc_hevc -base_encoder nvenc_hevc -eil_params "<enhancement parameter string>;”

Following the same logic as other base encoders, bitrate, frame rate, resolution and gop are specified as normal, however other commands need to be within the eil_params.

Post NVENC SDK 10.0 the API structure changed. For a guide to translate your preset please see here. Old preset options; [default, hp, hq, lossless, lossless_hp] are now updated to be a integer with 'preset=X' where the value range is 1-7 (P7 highest quality, P1 performance).

V-Nova LCEVC FFmpeg decoder commands

The V-Nova LCEVC decoder can be used similarly to other codecs in FFmpeg or FFplay, with one important difference. The enhancement layer is embedded as metadata in a fully compliant and backward compatible H.264/AVC or H.265/HEVC elementary stream. Therefore, the decoder must be instructed to extract and decode LCEVC data.

The command line to enable V-Nova LCEVC decoding of an LCEVC-enhanced transport stream or MP4 file, is as follows:

ffmpeg.exe -vcodec lcevc_h264 -i stream.ts -vcodec rawvideo output.yuv

ffmpeg.exe -vcodec lcevc_h264 -i stream.mp4 -vcodec rawvideo output.yuv

The equivalent command line for HEVC is:

ffmpeg.exe -vcodec lcevc_hevc -i stream.ts -vcodec rawvideo output.yuv

ffmpeg.exe -vcodec lcevc_hevc -i stream.mp4 -vcodec rawvideo output.yuv

And for FFplay, h.264 and HEVC respectively:

ffplay.exe -vcodec lcevc_h264 -i stream.mp4

ffplay.exe -vcodec lcevc_hevc -i stream.mp4

Decoding to perform Objective evaluation

To perform objective metric calculations when dithering is enabled in LCEVC encoding, dithering must be disabled as follows:

ffmpeg.exe -vcodec lcevc_h264 -disable_dithering 1 -i stream.mp4 -vcodec rawvideo output.yuv

To calculate metrics, the command line is similar to that of other codecs in FFmpeg, in line with guidelines included at the following link, and as shown in the following command line:

https://github.com/Netflix/vmaf/blob/master/resource/doc/libvmaf.md

ffmpeg.exe -vcodec lcevc_h264 –i input_stream.ts -vcodec rawvideo -s 1920x1080 -i reference_yuv.yuv -filter_complex " [0:v]scale=1920x1080:flags=bicubic[main];[main][1:v]libvmaf" -f null

Example script to encode, decode and calculate metrics

~/vnova/ffmpeg/ffmpeg \ -framerate $FPS \ -vcodec rawvideo \ -pix_fmt yuv420p \ -s $RESO \ -i $INPUT \ -vcodec lcevc_h264 \ -base_encoder x264 \ -b:v $BITRATE \ -eil_params "lcevc_tune=vmaf;dc_dithering_type=none;preset=medium;rc_pcrf_window_type=rolling" \ -f mp4 \ outputs/"$FILE"_vnova.mp4

ffmpeg \ -s $RESO \ -framerate $FPS \ -vcodec rawvideo \ -i $INPUT \ -vcodec libx264 \ -b:v $BITRATE \ -preset medium \ -g $FPS \ -f mp4 \ outputs/"$FILE"_libx.mp4

~/vnova/ffmpeg/ffmpeg -y \ -vcodec lcevc_hevc \ -disable_dithering 1 \ -i outputs/"$FILE"_vnova.mp4 \ -vcodec rawvideo \ -s $RESO \ -framerate $FPS \ -pix_fmt yuv420p \ -i $INPUT \ -filter_complex "[0:v]scale=1920x1080:flags=bicubic[main];[main][1:v]libvmaf=model_path=/path/to/vmaf_v0.6.1.pk1" \ -f null -

~/vnova/ffmpeg/ffmpeg -y \ -i outputs/"$FILE"_libx.mp4 \ -s $RESO \ -framerate $FPS \ -pix_fmt yuv420p \ -i $INPUT \ -filter_complex "[0:v]scale=1920x1080:flags=bicubic[main];[main][1:v]libvmaf" \ -f null -

Last updated